Extended Warranty
You can add an extended warranty to EPASS that your sales staff can offer at the point of sale. When you add an extended warranty, you define its attributes, including giving it a unique code and description, the list price, cost, and who it’s supplied from. You can also control the sale of these warranties by limiting them to be sold only on specific items or items that meet a specified price range. Once you’ve added an extended warranty, your sales staff can add it to an invoice.
There are two methods to add an extended warranty to EPASS: manually or importing.
Adding an Extended Warranty
-
Go to Tools > System Maintenance.
-
On the Tables tab, click Extended Warranty, and then click Open.
-
Click Add.
-
Fill out the Extended Warranty screen:
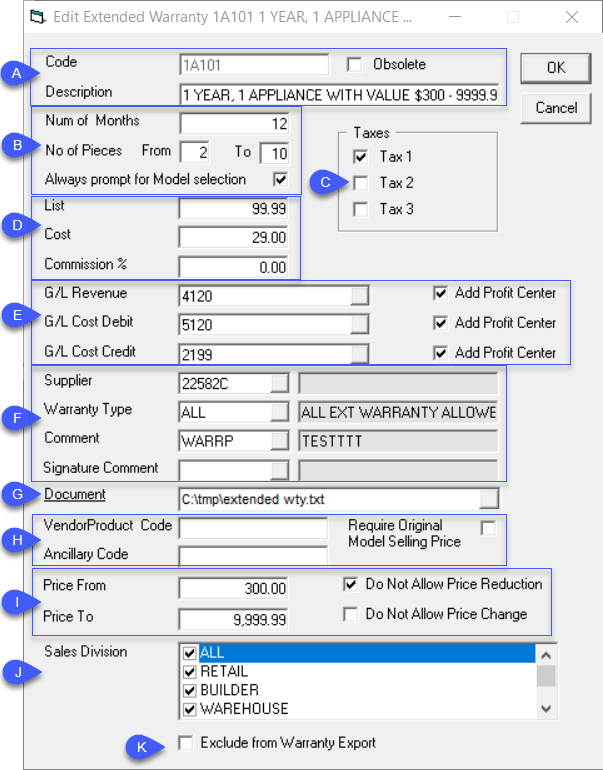
Description A Enter a unique Code and Description for the Extended Warranty. B Enter the duration of the invoice in Num of Months and the range of No of Pieces that the warranty covers. If you want to make sure sales staff always select the model before applying an extended warranty, select Always Prompt for Model Selection. C Select the taxes that are applied to this extended warranty. Taxes are defined in Invoicing Variables. D Enter the extended warranty’s List Price, Cost, and Commission %, if applicable. E Add the G/L accounts that the sale of the extended warranty apply to and select Add Profit Center. F Select the extended warranty Supplier from the dropdown list. If you control the sale of warranties by product type, select the Warranty Type from the dropdown. Select a Comment and Signature Comment from the dropdowns, if applicable. The comments appear on the customer invoice. G If there is additional documentation, such as the terms and conditions from the supplier, you can add it here. H Add the Vendor Code and Ancillary Code, if applicable. I Enter the product price range that this extended warranty applies to. Select Do Not Allow Price Reduction and Do Not Allow Price Change to prevent sales staff from altering the price of the extended warranty. J Select the Sales Divisions that this extended warranty belongs to. K Select Exclude from Warranty Export if you do not want this extended warranty to appear on the Warranty Export report. -
When you are finished, click OK. The new extended warranty is added to EPASS.
Importing an Extended Warranty
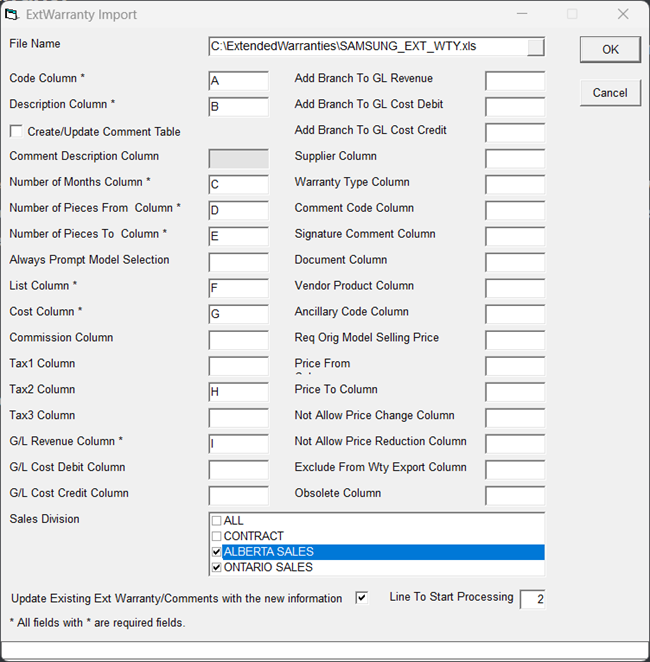
You can add several extended warranties at a time by importing the data from an Excel spreadsheet. To do so, you need to map each column of data in the spreadsheet to an appropriate extended warranty field in EPASS.
In Excel, columns are labeled with letters (A,B,C...) When EPASS imports data from an Excel sheet, it often needs to know which column contains which type of data—for example, column A might contain model codes, while column B contain descriptions of the models. Mapping this information gives EPASS this information so that it can read the Excel sheet and import the data into the correct fields.
To Import an Extended Warranty
-
Go to Tools > System Maintenance.
-
On the Tables tab, click Extended Warranty, and then click Open.
-
Click Import. The Extended Warranty Import window opens.
-
In the File Name field, click the Browse button and locate the spreadsheet file that you are importing.

-
Enter each column letter in the spreadsheet that matches a mapping field in the Extended Warranty Import window.
NoteExcept for the required fields indicated by an
*, you don't need to map every field in the Extended Warranty Import window. You only need to map the data that is present in the spreadsheet. -
In the Sales Division area, select each division that the imported extended warranty belongs to.

-
If you want the imported data to replace what's already in EPASS, select Update Existing Ext Warranty/Comments with the New Information.

-
Click OK to start the import. After the import is complete, a PDF report opens listing the number of new records created, updated, and any errors encountered during the update.
The imported extended warranties are added to the Extended Warranty table.
See Also
November 25, 2025